How to Create and Manage Custom Url Shortcuts With Intune
Creating custom URL shortcuts that just appear on end-user desktops is not a very straightforward task with Intune at the moment. But we can remedy that with some PowerShell scripting.
I came across a problemt when I tried to deploy a web link to https://teams.microsoft.com to my end-users' desktops. I logged into Intune and went to the Apps section to go create a web link that would deploy to a set of users. I set up a small group of 3 test devices that I could check to make sure the web link would deploy properly, and I waited for them to pick up the link.
After about an hour of waiting for the links to appear on my test devices' Desktop folder, I decided to check the device install reports from Intune. It said that the app had successfully deployed, or rather, that the devices now had the link. I did not realize that the link that it creates is not stored in the user's Desktop folder.
Now there is the easy way to fix this, and that is to write a quick PowerShell script that will drop the URL on the users Desktop, and be done with it. But what if the user decides to do something, like delete the shortcut? What if you want to remove the shortcut from desktops after realizing you don't need it anymore?
We can better manage our shortcuts by packaging our scripts and deploying them as a Win32 app with Intune.
By packaging the scripts as a Win32 app, we have the power to remove the shortcut if we ever wanted to. If a user deletes the shortcut, Intune will eventually detect that, and recreate the shortcut. We can also create and deploy custom icons for our shortcuts. In my case, I wanted to deploy the shortcut URL to teams.microsoft.com with the Microsoft Teams icon used by the desktop app.
Now, lets create a manageable URL Desktop shortcut.
Step 1: create the files:
Let's prepare everything we need to before we start scripting. First, create a folder to store all of our files in.
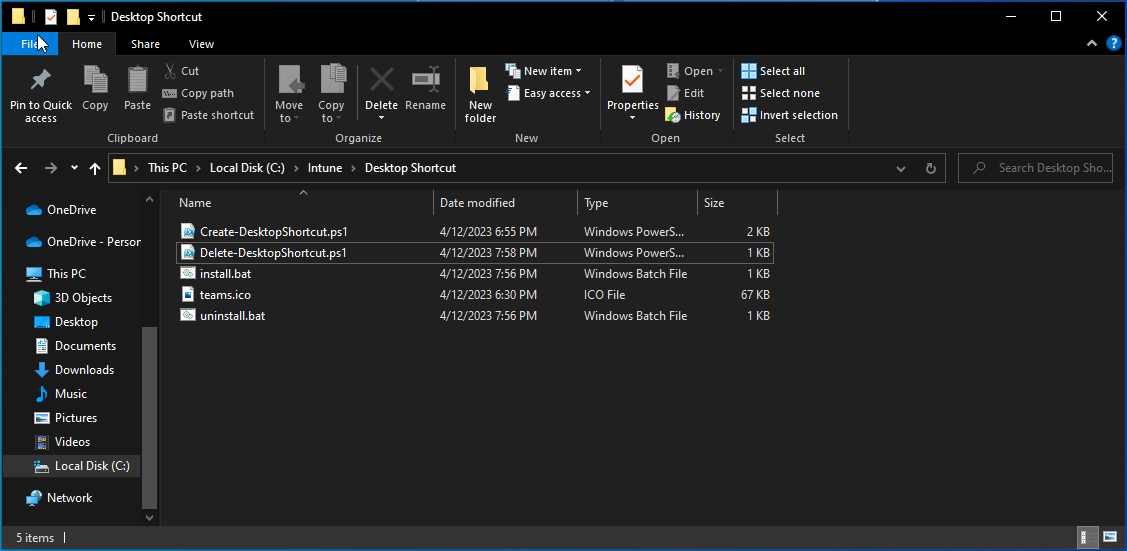
I created the folder C:\Intune\Desktop Shortcut. This is where we will store all of our scripts and files in this article. Feel free to change this to a directory that you create.
Now create the following files inside of the new folder you created:
Create-DesktopShortcut.ps1Delete-DesktopShortcut.ps1install.batuninstall.bat
If you created the same folder structure I did, you should now have the following items:
C:\Intune\Desktop Shortcut\Create-DesktopShortcut.ps1C:\Intune\Desktop Shortcut\Delete-DesktopShortcut.ps1C:\Intune\Desktop Shortcut\install.batC:\Intune\Desktop Shortcut\uninstall.bat
Optionally, put an icon file in this directory. For the purposes of this article, I'll be deploying the link to teams.microsoft.com, and so I'll be using an icon file called teams.ico, located at C:\Intune\Desktop Shortcut\teams.ico
Now you're done, let's move on to scripting.
Step 2: write the code
Create-DesktopShortcut.ps1
Open up Windows PowerShell ISE (or any text editor), and open the Create-DesktopShortcut.ps1 file we created. It should be a blank, empty file. Copy and paste the following code into it:
 1$PSScriptRoot = Split-Path -Parent -Path $MyInvocation.MyCommand.Definition
 2$IconStore = "$env:PUBLIC\Link_Icons" # Where the *.ico file will be saved (Currently C:\Users\Public\Link_Icons)
 3$URL = "https://teams.microsoft.com" # Change to whatever link you want
 4$ShortcutName = "Microsoft Teams.lnk" # Must end with .lnk for icon to work
 5$IconFileName = "teams.ico" # The icon file you want to use
 6
 7# Path where you want to store the shortcut. Set to the currently logged in user's Desktop folder.
 8$StorePath = [Environment]::GetFolderPath("Desktop") # Change to ("CommonDesktopDirectory") for Public Desktop
 9
10# Store the Icon file locally to access
11if (Test-Path -Path $IconStore) {
12    if (-not (Test-Path -Path "$IconStore\$IconFileName")){
13        Copy-Item -Path "$PSScriptRoot\$IconFileName" -Destination $IconStore -PassThru # Move the icon to local storage
14        attrib +h "$IconStore\$IconFileName"
15    }
16}
17else {
18    New-Item -Path "$IconStore" -ItemType Directory # Directory to store the icon file in
19    attrib +h $IconStore # Make directory hidden to keep users from messing with it
20    Copy-Item -Path "$PSScriptRoot\$IconFileName" -Destination $IconStore -PassThru # Move the icon to local storage
21    attrib +h "$IconStore\$IconFileName"
22}
23
24$Shell = New-Object -ComObject ("WScript.Shell")
25
26$Shortcut = $Shell.CreateShortcut("$StorePath\$ShortcutName")
27$Shortcut.Targetpath = $URL
28$Shortcut.IconLocation = "$IconStore\$IconFileName"
29$Shortcut.Save()
30
31# clean up the COM objects
32[System.Runtime.Interopservices.Marshal]::ReleaseComObject($Shortcut) | Out-Null
33[System.Runtime.Interopservices.Marshal]::ReleaseComObject($Shell) | Out-Null
34[System.GC]::Collect()
35[System.GC]::WaitForPendingFinalizers()
- Change
$StorePathto the folder you want to store the shortcut to. It is currently set to the Desktop folder of the logged in user. - Change
$IconStoreto the folder you would like to save your*.icofiles to. - Change
$URLto the URL of the site you want to link to. - Change
$ShortcutNameto whatever you want to name the shortcut. The current name will display asMicrosoft Teams - Change
$IconFileNameto reflect the name of your*.icofile.
Once you are done making sure everything is configued properly, save this file and close it.
Delete-DesktopShortcut.ps1
Open up the Delete-DesktopShortcut.ps1 file we made earlier, and copy and paste the following code into it:
1$StorePath = [Environment]::GetFolderPath("Desktop")
2$ShortcutName = "Microsoft Teams.lnk"
3$Shortcut = "$StorePath\$ShortcutName"
4$IconFileName = "teams.ico" # The icon file you want to use
5$IconStore = "$env:PUBLIC\Link_Icons" # Where the *.ico file will be saved (Currently C:\Users\Public\Link_Icons)
6
7Remove-Item -Path $Shortcut -Force # Delete the shortcut
8Remove-Item -Path "$IconStore\$IconFileName" -Force
- Make sure that
$StorePathin this file is the same as the$StorePathvairable in theCreate-DesktopShortcut.ps1file. - Make sure that
$ShortcutNamein this file is the same as the$ShortcutNamevairable in theCreate-DesktopShortcut.ps1file. - Make sure that
$IconFileNamein this file is the same as the$IconFileNamevairable in theCreate-DesktopShortcut.ps1file. - Make sure that
$IconStorein this file is the same as the$IconStorevairable in theCreate-DesktopShortcut.ps1file.
Once you are done making sure everything is configued properly, save this file and close it.
install.bat
Open install.bat and paste the following code into it:
1SET WorkingDir=%cd%
2SET PSPath='%WorkingDir%\Create-DesktopShortcut.ps1'
3PowerShell -NoProfile -ExecutionPolicy Bypass -Command "& %PSPath%"
Once you paste the code in, save this file and close it.
uninstall.bat
Open uninstall.bat and paste the following code into it:
1SET WorkingDir=%cd%
2SET PSPath='%WorkingDir%\Delete-DesktopShortcut.ps1'
3PowerShell -NoProfile -ExecutionPolicy Bypass -Command "& %PSPath%"
Once you paste the code in, save this file and close it.
Quick overview of the scripts:
Create-DesktopShortcut.ps1creates the shortcut and sets an optional icon file.Delete-DesktopShortcut.ps1removes the shortcut.install.batexecutes theCreate-DesktopShortcut.ps1script. This is for convienience when configuring the install command in Intune later.uninstall.batexecutes theDelete-DesktopShortcut.ps1script. This is for convienience when configuring the uninstall command in Intune later.
Now that we have the scripts made, it's time to package them into a *.intunewin file.
Step 3: package the scripts
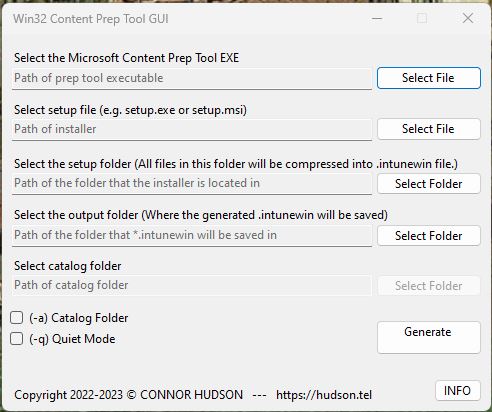
In this article, I'm using the Win32 Content Prep Tool GUI (W32GUI) to make packaging the scripts simpler. If you want to follow along, visit the GitHub repo and download the latest release of it.
You will also need to download the Microsoft Win32 Content Prep Tool from Microsoft's GitHub repo. This is required to package the scripts. Download the zip file from the repo and extract the file called IntuneWinAppUtil.exe to an accessible folder. I stored it at C:\IWAU\IntuneWinAppUtil.exe
- Launch The W32GUI application
- Select the Microsoft Content Prep Tool EXE (
IntuneWinAppUtil.exe) - If you store this inC:\IWAU\IntuneWinAppUtil.exe, this value will autofill.
- Select the setup file (
install.batwill be our setup file)
- Select the setup folder (The folder containing your files to upload,
C:\Intune\Desktop Shortcutif you followed along)
- Select the output folder (where your
*.intunewinfile will be saved. This can be saved anywhere)
- Select the Microsoft Content Prep Tool EXE (
Your W32GUI app should have all required values filled out now and should look like this:
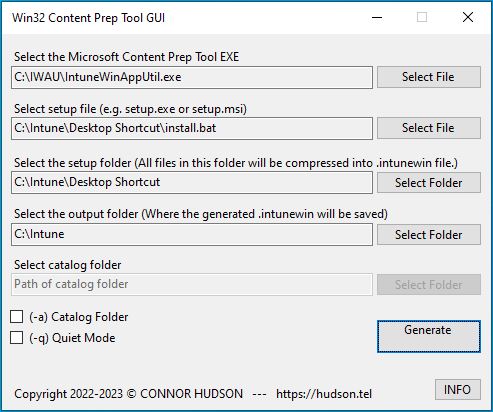
*.intunewin file. If yours looks like the picture above, it should create C:\Intune\install.intunewin. You will upload install.intunewin to Intune as a Win32 app.
Now to upload and configure the app.
Step 4: upload and create the Win32 app
Navigate to the Intune portal.
Go to Apps > Windows > Add > Select Windows app (Win32) app type, and upload your install.intunewin file.
1. Under the App information settings:
- Set Name to whatever you want to call this app..
- Set Description to a description of your managed URL.
- Set Publisher to the publisher of the URL.
- Optionally set a Logo for your app
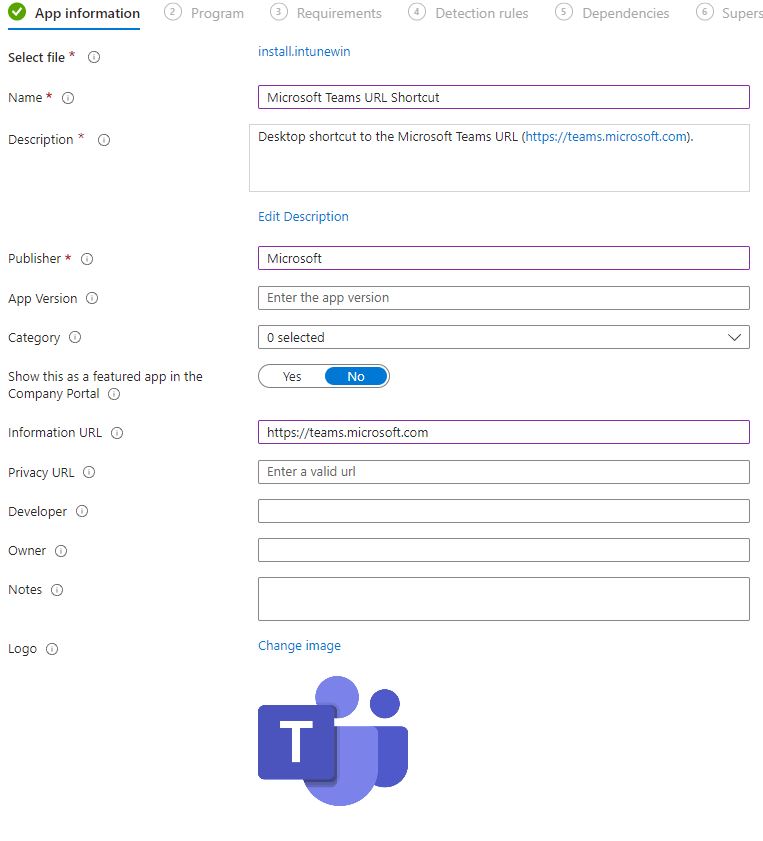
- Click Next
2. Under the Program settings:
- Set Install command to
install.bat - Set Uninstall command to
uninstall.bat - Set Install behavior to System
- Set Device restart behavior to No specific action
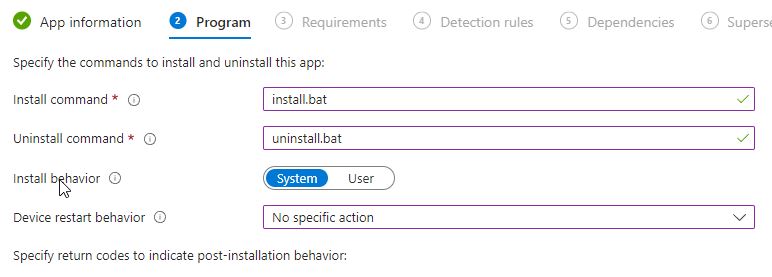
- Click Next
3. Under the Requirements settings:
- Set the Operating system architecture according to your environment.
- Set the Minimum operating system according to your environment.
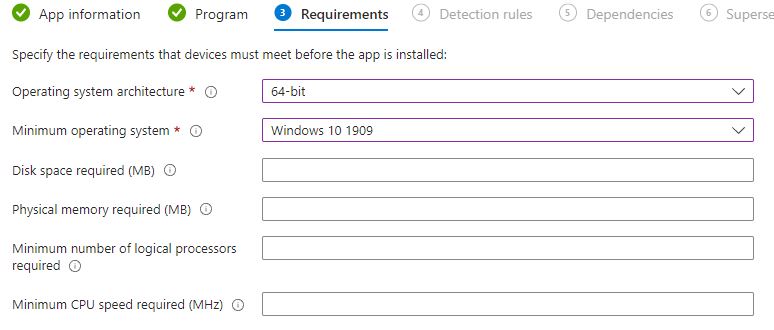
- Click Next
4. Under the Detection rules settings:
- Set the Rules format to *Manually configure detection rules
- Add a new rule
- Set Rule type to File
- Set Path to the path of your shortcut. If you saved it to a user's Desktop, the path will be
%USERPROFILE%\Desktop - Set File or folder to the name of your shortcut file. In my case, it was named
Microsoft Teams.lnk - Set Detection method to File or folder exists.
- Set Associated with a 32-bit app on 64-bit clients to No
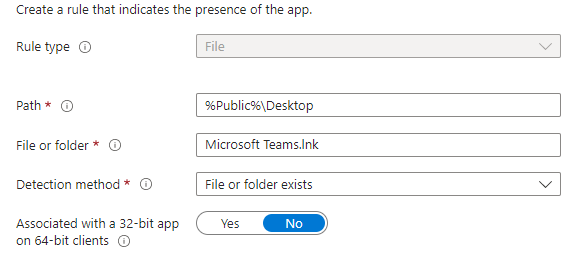
- Click OK to save the rule and then click Next
5. Under the Dependencies settings:
- If you need to set any dependencies (apps that install BEFORE this app), then go ahead and do so. I wont be doing that in this article.
- Click Next
6. Under the Supersedence settings:
- If you need this app to replace another, go ahead and set this now. This is useful if you have an old URL shortcut that is deprecated, and you need to replace it with a new one. Intune would automatically uninstall the old app or shortcut, and replace it with this one. I'm not doing that in this article.
- Click Next
7. Under the Assignments settings:
- Assign the groups you want to deploy the app to. You can also assign an uninstall group in case you ever want to delete this shortcut from desktops for some reason. That's why we created the uninstall command.
- If you don't have any groups to assign this app to, go ahead and move on. You can always create them later and assign this app to them in the future.
- Click Next
8. Under the Review + create settings:
- Review the settings and configuration of your app. Make sure everything looks right before creating the app. You can always come back and edit the properties of this app if you ever need to in the future.
- Once you are confidant that everything is in order, click Create. Intune will begin to create and upload your app.
Once the app is created, Intune will start deploying it to the groups you specified in the Assignments property.
Step 5: managing your app
This is pretty easy to do now that it has been created in Intune.
If a user deletes the link, Intune will automatically detect it and recreate the shortcut. It checks in regular intervals.
If you ever need to delete the shortcut from user computers, you can assign an uninstall group to the app and place the users inside of it. Once they pick up the new rule, they will begin to run the deletion scripts.
If the URL ever needs to be updated, you can edit the scripts to have the new URL in them, package and upload them to Intune as a new Win32 app, and set the Supersedence to supersede the old shortcut. Intune will then start deleting the old shortcut, and installing the new one automatically. New users won't ever get the old shortcut, they will only get the new one. Once the old one has been completely phased out, you can safely delete it from the Intune portal.