Creating Desktop Shortcuts for Apps Deployed with Intune
Depending on the application and environment, you may want to set a Desktop shortcut to certain applications in order to make it more convienient for your end users to access them.
In this article, I'll go over how we can use PowerShell and the power of Win32 apps to set desktop shortcuts for our users. I'll be using calc.exe in the scripts I make, but this will apply to any applications.
Method 1: Set a desktop shortcut by deploying a script
This is by far the simplest option. We just create a simple PowerShell script, and deploy it to a group of users or devices.
Start by opening up Windows PowerShell ISE as an Administrator, and making sure you have an empty script open.
Copy and paste the following code into the script:
1$TargetFile = "$env:SystemRoot\System32\calc.exe"
2$ShortcutFile = "$env:Public\Desktop\calc.lnk"
3$WScriptShell = New-Object -ComObject WScript.Shell
4$Shortcut = $WScriptShell.CreateShortcut($ShortcutFile)
5$Shortcut.TargetPath = $TargetFile
6$Shortcut.Save()
Now currently, this script will create a shortcut to Calc.exe in the Public Desktop. If you want to change it, change the following values:
- Change the value of
$TargetFileto the path of the installed application you want to create a shortcut for. - Change the value of
$ShortcutFileto the path you want to store the shortcut to. For example, if you want it to be on the users Desktop, you might change this to$ShortcutFile = "env:USERPROFILE\Desktop\application.lnk". This will store the shortcut in the Desktop folder of the currently logged in user.
Save the script. Name it something descriptive, like Create-DesktopShortcut.ps1.
Navigate to Intune and go to Devices > Scripts and press Add > Windows 10 and later.
- Enter a Name and optionally a Description, then click Next.
- Under Script location, select the PowerShell script you just made.
- Set Run this script using the logged on credentials to No.
- Set Enforce script signature check to No.
- Set Run script in 64 bit PowerShell Host to whatever your environment requires. You can typically leave this set to No, now click Next.
Now assign whatever groups you want to deploy the script to. You may leave this blank and come back to it later if you have to. After that, review and make sure your settings are correct, then add your script to Intune. Once it is applied to groups, Intune will start deploying it.
Method 2: Deploying a Win32 app to create a shortcut
This method is better if you want to deploy a desktop shortcut for an application that may or may not be installed on a users device. For example, lets say you are deploying Adobe Acrobat Reader to your end users through Intune. You want a desktop shortcut to Acrobat so your users can easily access the app.
This is great, but we are presented a problem. If the script runs before the application installs, no desktop shortcut will be made.
In order to be sure that the app installs before the script runs, we can package our scripts as a Win32 app and deploy it after the application we are targetting has been installed.
For example, if we deployed Acrobat Reader, then we can deploy the scripts as a Win32 app called Acrobat Reader Shortcut, and set Acrobat Reader as a dependency of Acrobat Reader Shortcut, ensuring that Acrobat Reader will be installed before The scripts (Acrobat Reader Shortcut) are run.
So let's create a package to manage the shortcut.
Step 1: Create the scripts
To start, we can reuse the script we made in in Method 1. Save it and name it Create-DesktopShortcut.ps1.
Now open up Windows PowerShell ISE and create two new scripts.
In the first script, copy and paste the following code into it, and save it as Create-DesktopShortcut.ps1.
1$TargetFile = "$env:SystemRoot\System32\calc.exe"
2$ShortcutFile = "$env:Public\Desktop\calc.lnk"
3$WScriptShell = New-Object -ComObject WScript.Shell
4$Shortcut = $WScriptShell.CreateShortcut($ShortcutFile)
5$Shortcut.TargetPath = $TargetFile
6$Shortcut.Save()
In Create-DesktopShortcut.ps1, set the $TargetFile value to the executable of the application you want to launch when the shortcut is pressed, and set the $ShortcutFile value to the location you want to store the shortcut. The current settings create a shortcut for calc.exe in the Public Desktop directory.
In the second script, copy and paste the following code into it, and save it as Delete-DesktopShortcut.ps1.
1$ShortcutFile = "$env:Public\Desktop\calc.lnk"
2Remove-Item $TargetFile -Force
Make sure that the value of $ShortcutFile is the same in both scripts.
Delete-DesktopShortcut.ps1 will delete the shortcut we create with Create-DesktopShortcut.ps1. You may not need this, but we will use it for our Uninstall command when configuring the Win32 app in Intune. This gives you the option to delete the shortcut in the future if you ever need to.
Create a folder to store the scripts in. I put my scripts in C:\Intune\Create Desktop Shortcut. If you follow along, you should have the following files:
C:\Intune\Create Desktop Shortcut\Create-DesktopShortcut.ps1C:\Intune\Create Desktop Shortcut\Delete-DesktopShortcut.ps1
Once you have the scripts set up and put into a folder, we can package them into a *.intunewin file.
Step 2: Prepare the scripts for upload
Now we need to prepare the scripts for upload by packing them into a *.intunewin file.
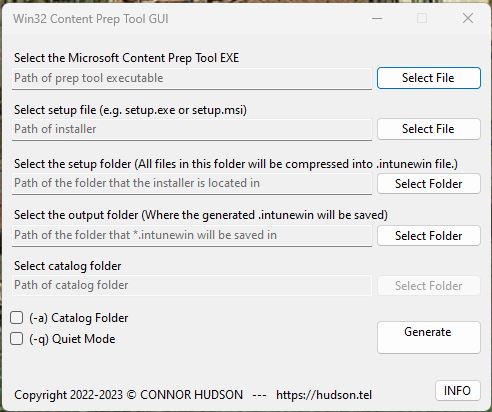
In this article, I'll be using the Win32 Content Prep Tool GUI to make packaging easier. Download the latest release if you want to follow along. Using the GUI, you won't have to deal with formatting or typing out filepaths
Download the Microsoft Content Prep Tool, this is Microsoft's official command line app for packaging Win32 apps.
- Open up
Win32ContentPrepToolGUI.exe- Starting from the top:
- Select the Microsoft Content Prep Tool EXE (path to
IntuneWinAppUtil.exe) 
- Select the setup file (this will be
Create-DesktopShortcut.ps1) 
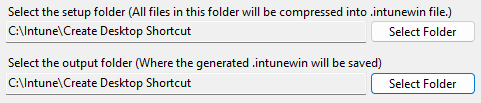
- Select the setup folder and output folder
- Select the Microsoft Content Prep Tool EXE (path to
- Starting from the top:
Your GUI should now be populated and look like this: 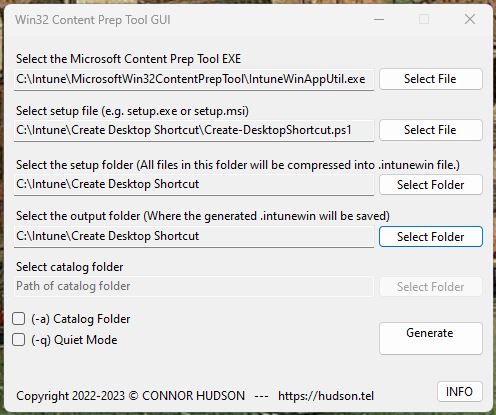
Once your values are filled in like above, if you go ahead and press Generate, your *.intunewin file will be created and stored in the output folder. Once you have this, we can start configuring the new app in Intune.
Step 3: Creating the app in Intune
Now that you have your *.intunewin file, it's time to upload it to Intune and deploy the scripts.
- Navigate to Intune.
- Inside the Intune admin center, go to Apps > Windows > Add > Under App type select Windows app (Win32)
- Upload your
*.intunewinfile. Click Next - Under the App information settings:
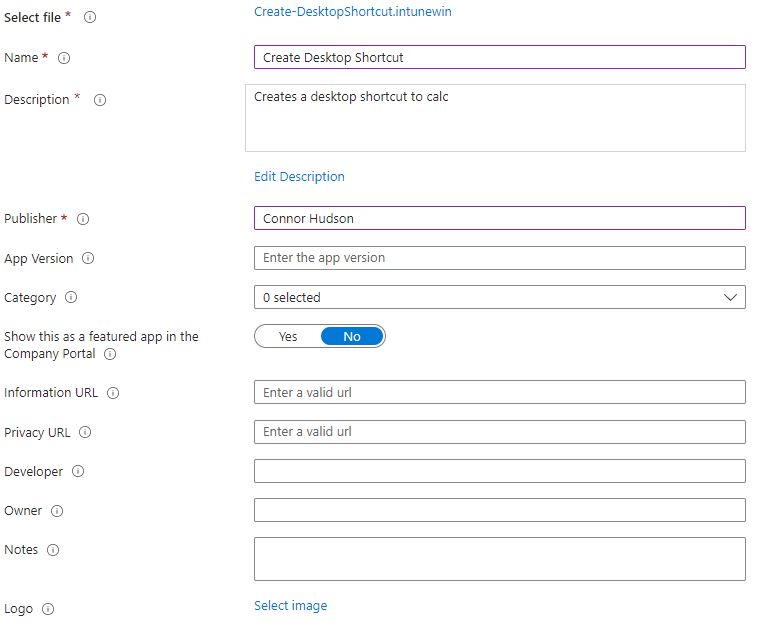
- Give your app a Name
- Give your app a Description
- Give your app a Publisher
Your App information settings should look like the image below, edit and add information according to your environment requirements:
- Click Next
-
Under the Program settings:
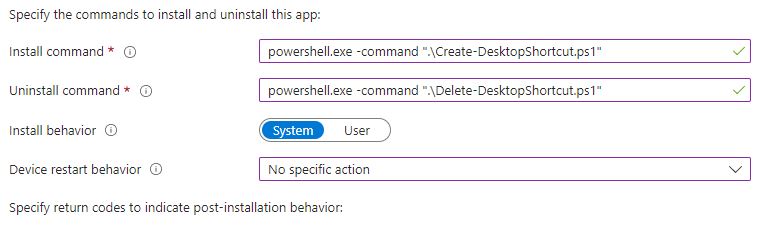
- Set the Install command to:
powershell.exe -command ".\Create-DesktopShortcut.ps1" - Set the Uninstall command to:
powershell.exe -command ".\Delete-DesktopShortcut.ps1" - Set the Install behavior to System
- Set the Device restart behavior to No specific action
Your Program settings should look like the image below:
- Click Next
- Set the Install command to:
-
Under the Requirements settings:
- Set the Operating system architecture according to your environment. I chose 64-bit
- Set the Minimum operating system according to your environment. I chose Windows 11 21H2
- Click Next
-
Under the Detection rules settings:
- Set the Rules format to Manually configure detection rules
- Add a new rule
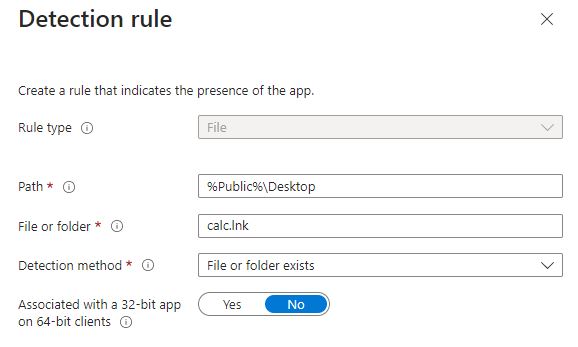
- Set the Rule type to File
- Set the Path to the folder your shortcut will be stored. If it's in the Public Desktop, set it to
%Public%\Desktop - Set the File or folder to the name of your shortcut. In the code I posted above, the shortcut is called
calc.lnk. Change this as needed. - Set Detection method to File or folder exists
- Set Associated with a 32-bit app on 64-bit clients as needed based on your requirements. I set mine to No.
Your Detection rules settings should look like the image below:
- Click OK to add the rule, and then click Next
-
Under the Dependencies settings:
- Click Add
- Select the app that you want to make the shortcut to.
By setting the dependency, you can be sure that the application you select will be installed BEFORE the scripts run. This setting is key to all of this setup.
- Click Next
-
Leave Supersedence settings blank, click Next
-
Assign the groups that you want to apply the scripts to. Click Next
-
Review your settings and hit Create to add the app to Intune.
Once your app finishes uploading, Intune will start applying it to the users or devices specified.
You can also set groups to uninstall the app (remove the shortcut) since we set up a script that deletes the shortcut. You would configure that in the Properties section of your app, under the Assignments settings.